Russian Alfa Class Submarine in 1/72 scale
- May 6, 2016
- 3 min read
This was a fun and fairly quick project that I undertook for a customer out of Nebraska. The kit came from a builder by the name Tim Cook, and the quality is really quite good. The cast parts were well done and the layup was nice and thin and neatly laid up in epoxy glass.
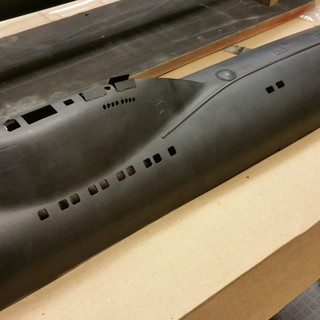
When I received it, the project had been started and the rear appendages and control surfaces were in place, the hull was fiberglass together, and some of the sail detail was completed.
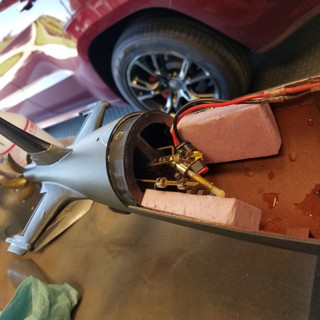
To save on costs, the customer elected to go with an older D&E Miniatures WTC that I had in stock, and also went with a non-accurate prop that was similar in size to the prop that the Alfa would have run.

One thing that I really don't like doing is picking up where other people left off. In this case, there were two main issues that presented themselves. The first was that the opening in the upper hull for access to the internals was way too small. It was cut laterally across the boat just in front of the sail and again a few inches behind it. This meant that installation of the WTC was going to be very difficult, and running the rear linkages nearly impossible.
I typically like to split the model along the centerline, which offers unrestricted access to the interior. However, this was what I had to work with. I elected to cut the rear section of the hull along the same centerline as the "lid" was already cut, effectively elongating the access by about 6 inches. This offered far better access and a minimum investment of time and effort into reworking the hull.
The second big challenge was the rear linkages. They were binding badly. The solution to this was to snap off the out edges of the rear stabilizers, freeing up the rudders and dive planes. Those were removed, cleaned, a bad bend straightened, lubricated and then reinstalled. The broken tips of the stabilizers were then re-attached with thin CA and the seam was invisible, particularly after priming and painting.
What I found out after the case was that there was actually a third issue that was hidden until primer was applied. The rear stabilizers were actually cast in a resin that refused to fully cure. Upon corresponding with Tim Cook, the kit's designer, I learned that the resin supplier had put out bad batches of resin, and he was a victim of that. As the rear stabilizers and control surfaces were already in place and functioning perfectly, I elected to grind out the affected areas, fill them with polyester filler, and then sand and re-paint. As a side-note, Tim sent out a replacement set of appendages, just in case, free of charge and they'll be going to the owner along with the completed model.
Painting was fairly straightforward and I used dry transfers for the waterline, scraping them up to look like an aged boat (I really hate that "fresh from the drydocks" look). I taped the waterline and misted the lower hull with a combination of gray and gray/green paint to mimic the growth that plagues all watercraft. The upper hull was weathered by streaking the hull using white pastels, dragged across the hull in line with the path that water would take when flowing down the hull.
The maiden voyage went exceptionally well. The boat held perfect trim and despite my having to operate it with one hand and film with the other, control was very easy and it held periscope depth using the automatic pitch controller within plus or minus an inch. The turning radius was very large, as expected, particularly when surfaced. This is due to the very small control surfaces and the fact that the upper rudder is not in the water at all when on the surface. The boat is also very fast, just as the real boat was, and I'd guess it managed about 4 or 5mph when submerged.
All in all this was a fun build and I hope the new owner gets a lot of fun out of it in the future.


Comments